Vulnerabilities
The Vulnerabilities section provides an overview of detected vulnerabilities on computers. The computer is scanned to detect any installed software vulnerable to security risks. Automated scanning with instant reporting to the console allows you to prioritize vulnerabilities based on severity, manage security risks and allocate resources effectively. Multiple filtering options allows you to identify and focus on critical security issues.
Prerequisites To view and enable ESET Vulnerability & Patch Management, ensure you have one of the following tiers: •ESET PROTECT Elite •ESET PROTECT Complete •ESET PROTECT MDR •ESET PROTECT MDR Ultimate You can enable ESET Vulnerability & Patch Management on computers running: •ESET Management Agent version 10.1+ •ESET Endpoint Security for Windows version 10.1+ •ESET Endpoint Antivirus for Windows version 10.1+ •ESET Server Security for Microsoft Windows Server version 11.0+ •ESET Mail Security for Microsoft Exchange Server 11.0+ •ESET Security for Microsoft SharePoint Server 11.0+ •ESET Endpoint Security for macOS version 8.0+ •ESET Endpoint Antivirus for Linux version 11.0+ (Patch Management available from version 12.0). Vulnerabilities detection is currently supported only on the following operating systems: ✓Ubuntu Desktop 20.04 LTS ✓Ubuntu Desktop 22.04 LTS ✓Ubuntu Desktop 24.04 LTS ✓Red Hat Enterprise Linux 8 with supported desktop environment installed ✓Red Hat Enterprise Linux 9 with supported desktop environment installed ✓Linux Mint 20 ✓Linux Mint 21.1, Linux Mint 21.2 •ESET Server Security for Linux version 11.0+ (Patch Management available from version 12.0) |
You can also purchase ESET Vulnerability & Patch Management as a separate add-on for the ESET PROTECT Entry and ESET PROTECT Advanced tier. |
ESET Vulnerability & Patch Management is not supported on Windows devices with ARM processors. |
Enable Vulnerability & Patch Management
1.Click Computers.
2.Select the computer/group where you want to enable Vulnerability & Patch Management.
3.Select Configure Solutions and click Enable Vulnerability & Patch Management.
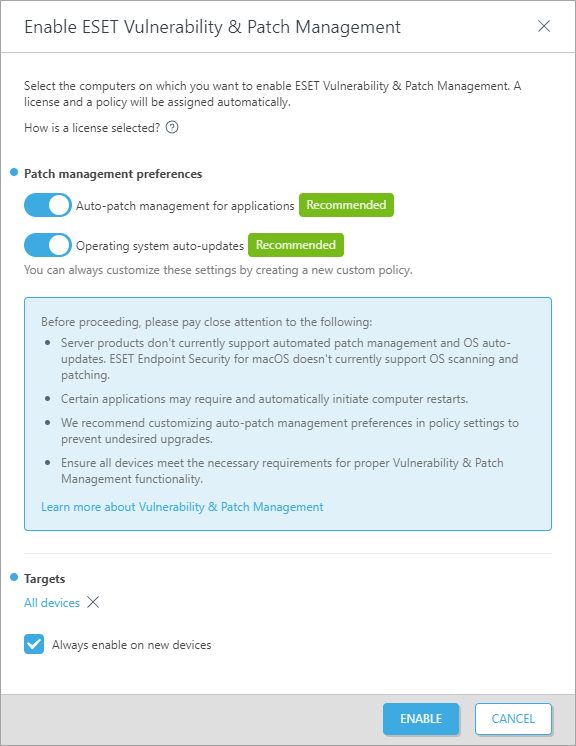
4.In the Enable ESET Vulnerability & Patch Management window:
a.Verify the Auto-patch management for applications toggle is enabled to automatically apply missing patches to the selected computers.
b.Verify the Operating system auto-updates toggle is enabled to automatically apply OS updates to the selected computers.
c.Targets—keep the default (All devices) or select the targets (computers, static or dynamic group).
d.Optionally, select Always enable on new devices. This option is displayed when you selected All devices.
5.Click the Enable button.

When Vulnerability & Patch Management is enabled:
•The Vulnerabilities icon appears next to the computer name.
•You can see the Vulnerability & Patch Management tile with the Active status in computer details.
Some applications may restart the computer automatically after an upgrade. |
Some applications (for example, TeamViewer) can be licensed to a specific version. Revise your applications. To avoid an unnecessary upgrade, set Auto-patch strategy > Patch all except excluded applications while creating a policy. |
View Vulnerabilities
You can view Vulnerabilities from several places:
•Click Vulnerabilities in the main menu to open the Vulnerabilities section and view a list of vulnerabilities.
•Click Computers > click the computer and click Details > in the Vulnerability & Patch Management tile, click Show vulnerabilities to open the Vulnerabilities section.
•Click Computers > in the Vulnerabilities column, click the number of vulnerabilities on the selected computer to open the Vulnerabilities section.
Grouping of vulnerabilities
Select an option from the drop-down menu to group vulnerabilities:
•Ungrouped—default view
•Group by Application Name—vulnerabilities are grouped by vulnerable application name, with numbers of Affected Devices, Vulnerabilities and a percentage of all risk scores of visible vulnerabilities in the Overall Impact. When grouped, click an application row and click Show Vulnerabilities to display vulnerabilities for the selected application.
•Group by CVE—vulnerabilities are grouped by the CVE (Common Vulnerabilities and Exposure) number. A CVE is an identification number of a vulnerability. When grouped, click a CVE row and click Show Devices to display devices (computers) with the vulnerability.
Filtering the view
To filter, click Add Filter:
1.In some filters, you can select the operator by clicking the operator icon next to the filter name (the available operators depend on the filter type):
Equal to or Contains
Not equal to or Does not contain
Greater than or equal to
Less than or equal to
2.Select one or more items from the list. Type a search string or select the items from the drop-down menu in the filter fields.
3.Press Enter. Active filters are highlighted in blue.
•Application name—the application name with the vulnerability
•Application version—the application version
•Vendor—the application vendor with the vulnerability
•Risk score—vulnerability risk score from 0 to 100
Risk score—assesses the severity of computer system security vulnerabilities. A risk score is based on: •CVSSv2/CVSSv3 •CVE popularity—indicates the vulnerability activity level •Compromised risk rate—indicates the number of devices with confirmed vulnerability •CVE lifecycle—indicates the time elapsed since the vulnerability was first reported A risk score is indicated in: •yellow (0–40)—medium severity •red (41–100)—critical severity |
•CVE—a CVE (Common Vulnerabilities and Exposure) number, which is an identification number of a vulnerability
•Computer name—the name of the affected computer; click the computer name to view the details of the computer with the vulnerability
•Category—vulnerability category:
oApplication vulnerability
oOperating system vulnerability
•First seen—The date and time when the vulnerability was first detected on the device
•OS type—Windows, Linux or macOS
Vulnerability preview
Click an application name to view vulnerability details in a side panel. Vulnerability preview manipulation includes:
•![]() Next—displays the next vulnerability in the vulnerability preview side panel
Next—displays the next vulnerability in the vulnerability preview side panel
•![]() Previous—displays the previous vulnerability in the vulnerability preview side panel
Previous—displays the previous vulnerability in the vulnerability preview side panel
•![]() Manage content for Vulnerability Details—manages how the vulnerability preview side panel sections are displayed and in what order
Manage content for Vulnerability Details—manages how the vulnerability preview side panel sections are displayed and in what order
•![]() Close—closes the vulnerability preview side panel
Close—closes the vulnerability preview side panel

For more information, refer to the list of apps covered in Vulnerabilities.
CVEs covered by ESET
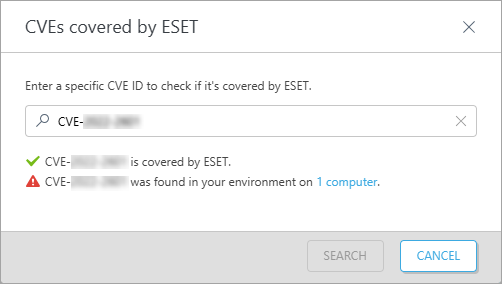
You can quickly verify whether the Vulnerability & Patch Management system can cover certain vulnerabilities.
•Click Check CVE coverage button > type CVE ID > click Search button

You will get a response if ESET can cover the vulnerability, if the vulnerability is present in your network environment, and on how many computers. You can click the computer(s) link to view the list of computers containing the specified vulnerability (CVE ID).
Fix Vulnerability
When a patch for the specific vulnerability exists, you can apply it immediately:
•Click a row > select Fix Vulnerability
•Select one or more rows > click the Actions button > select Fix Vulnerability
The task Apply application patch is scheduled to execute as soon as it is able.
Fix Vulnerability is supported only for computers running: •ESET Endpoint Security for Windows version 10.1+ •ESET Endpoint Antivirus for Windows version 10.1+ •ESET Server Security for Microsoft Windows Server version 11.0+ |
Mute/Unmute Vulnerability
You can mute or unmute vulnerabilities in several ways:
•Click a row > select Mute Vulnerability/Unmute Vulnerability
•Select one or more rows > click the Actions button > select Mute Vulnerability/Unmute Vulnerability
The muted vulnerability has a Muted flag. The purpose of the Muted state is to:
•Exclude the vulnerability from the count for a specific computer in the Vulnerabilities column in Computers. If a vulnerability is muted, the total count of vulnerabilities on the device decreases.
•Suppress the impact on related statistics in the ESET Vulnerability & Patch Management dashboard. The muted vulnerability is not considered in the data analysis and the representation on the dashboard.
Vulnerability scan
You can quickly scan a selected device for vulnerabilities and missing patches:
•In Vulnerabilities, click the computer row and select Computer > Scan Device > Vulnerability scan
•In Computers, click the computer row and select Scan Device > Vulnerability scan
•In Computers, select the computer and click the Actions button, then select Scan Device > Vulnerability scan
•In Computers or Vulnerabilities, select any group, click ![]() then select Tasks > Scan > Vulnerability scan
then select Tasks > Scan > Vulnerability scan
Task Start vulnerability scan is scheduled to execute as soon as possible.
The task may have a higher demand on the device resources for up to 10 minutes. |
Disable settings
You can disable the settings with the toggle ![]() .
.
You can create a report template with vulnerability data and then add the report to the Dashboard.
For more information, see Vulnerability & Patch Management FAQ.