Use the ESET Active Directory Scanner to synchronize Active Directory computers and users with the ESET PROTECT Web Console.
|

|
ESET regularly updates the Active Directory Scanner to enhance its functionality. You can find more details in the changelog.
|
Prerequisites
•Run the Active Directory Scanner as an Active Directory user on a computer connected to Active Directory.
•Supported operating systems (support for HTTP/2): Windows 10, Windows Server 2016 and later.
•Download and install .NET (version 8.0).
•Prepare the user configuration file (config.json) for Active Directory User Synchronization. config.json is included in the Active Directory Scanner zip file.
•User access rights permission for AD Scanner Access Token: Write
Using the Active Directory Scanner
1.In the ESET PROTECT Web Console, create the Agent GPO deployment script.
2.Log in to a computer in your Active Directory with an Active Directory user account. Ensure it meets the prerequisites listed above.
3.Download the latest Active Directory Scanner to the computer.
4.Unzip the downloaded file.
5.Download the Agent GPO deployment script (created in step 1) and copy it to the ActiveDirectoryScanner folder (containing all Active Directory Scanner files).
1.In the ESET PROTECT Web Console, go to Computers and select the Static Group where you want to synchronize the Active Directory structure.
2.Click the Gear  icon next to the selected Static Group, select icon next to the selected Static Group, select  Active Directory Scanner. Active Directory Scanner.
3.Click Generate to get the access token.
|

|
Each Static Group has a token. The token identifies the Static Group where the Active Directory will be synchronized.
To invalidate the current token for security reasons, click Regenerate to create a new token. If the Active Directory synchronization with ESET PROTECT is already running, the synchronization will stop after the security token change. You must run the Active Directory Scanner with the new token to re-enable the Active Directory synchronization.
To delete the token for security reasons, click Deactivate Token. To confirm token deactivation, click Deactivate.
|
4.Run the Active Directory Scanner (replace token_string with the token you copied in the previous step).
ActiveDirectoryScanner.exe --token token_string
|

|
By default, the latest Active Directory Scanner does not synchronize disabled Active Directory computers. To synchronize disabled Active Directory computers, use the --disabled-computers parameter:
ActiveDirectoryScanner.exe --token token_string --disabled-computers
|
|

|
Synchronization from specific Domain Controller
Specific Domain Controller
The --domain-controller parameter specifies the hostname or IP address of the machine to connect to in order to fetch data from the Active Directory.
When the --domain-controller parameter is set, the specified information will be saved to the database. Subsequently, whenever the client runs ADScanner, it will use the domain controller stored in the database.
To reset the domain controller configuration, set the --domain-controller parameter to an empty string. Example: --domain-controller ""
Specific Domain Controller Active Directory Username
The --domain-controller-user parameter specifies the Active Directory username. This username is associated with the --domain-controller parameter and is used for authentication. Example: --domain-controller-user "username"
Specific Domain Controller Active Directory Password
The --domain-controller-password parameter specifies the Active Directory password. This password is associated with the username provided in the --domain-controller-user parameter and is used for authentication. Example: --domain-controller-password "your_password"
|
5.When requested, type the Active Directory user password.
6.After the Active Directory Scanner completes the synchronization, your Active Directory structure (organizational units with computers) will appear in Computers in the ESET PROTECT Web Console as Static Groups with computers.
|

|
The Active Directory Scanner creates an Active Directory Synchronization task in the Windows Task Scheduler with a trigger repeat interval set to 1 hour. You can adjust the Active Directory synchronization interval in the Task Scheduler based on your preference. Any future changes to your Active Directory structure will be reflected in the ESET PROTECT Web Console after the next synchronization.
Optionally, you can use --no-scheduled-task parameter to start synchronization without the Windows Task Scheduler. Active Directory will be synchronized only once and future changes in Active Directory will not be automatically synchronized with ESET PROTECT. If the task already exists, --no-scheduled-task parameter will not create the task again or update it.
|
|

|
Active Directory synchronization limitations:
•Active Directory Scanner synchronizes only Active Directory organizational units that contain computers with DNS names. Organizational units that do not contain any computers will not be synchronized.
•If the organizational unit name changes in Active Directory, a new Static Group with the new name will be created in the ESET PROTECT Web Console after the next synchronization. The Static Group corresponding to the old organizational unit name will remain in the ESET PROTECT Web Console and it will be empty (computers will move to the new Static Group with the new name).
•If you delete an organizational unit in Active Directory, all computers in the unit will be removed from the corresponding Static Group in the ESET PROTECT Web Console.
•If you delete a synchronized Active Directory computer from the ESET PROTECT Web Console, it will not re-appear after the next synchronization, even though it remains in the Active Directory. |
To see the Active Directory Scanner help, use one of these parameters: -? -h --help.

For troubleshooting purposes, view the logs located in C:\ProgramData\ESET\ActiveDirectoryScanner\Logs.
|

|
If you delete a computer from the Active Directory, the computer will also be deleted from the ESET PROTECT Web Console.
|
|
1.In the ESET PROTECT Web Console, go to More > Computer Users and select the User Group where you want to synchronize the Active Directory structure.
2.Click the Gear  icon next to the selected User Group, select icon next to the selected User Group, select  Active Directory Scanner and copy the generated access token. Active Directory Scanner and copy the generated access token.
3.Click Generate to get the access token.
|

|
Each User Group has a token. The token identifies the User Group where the Active Directory will be synchronized.
To invalidate the current token for security reasons, click Regenerate to create a new token. If the Active Directory synchronization with ESET PROTECT is already running, the synchronization will stop after the change of security token. You must run the Active Directory Scanner with the new token to re-enable the Active Directory synchronization.
To delete the token for security reasons, click Deactivate Token. To confirm token deactivation, click Deactivate.
|
4.Run the Active Directory Scanner (replace token_string with the token you copied in the previous step).
ActiveDirectoryScanner.exe --user-token token_string --user-config config.json
|

|
--user-token and --token can be used concurrently. The tool will then synchronize both computers and users.
|
|

|
The user configuration file (config.json) recommendations
Follow the recommendations to configure config.json file (located in the same folder as ActiveDirectoryScanner.exe):
•Use "Include" and "Exclude" fields to include or exclude organizational units; determine the path to a specific unit, for example: "Users\\Bratislava\\TechDepartment". The path must be composed of organization unit names only.
•Use "ExcludeByID" to exclude specific users; specify their objectSid.
•An example of the syntax:
"Include": [
"path1", "path2", ...
],
"Exclude": [
"path1","path2", ...
],
"ExcludeByID": [
"objectSid1", "objectSid2"...
],
•Example: "Include": ["Users\\Bratislava\\TechDepartment"]. TechDepartment has more subunits, you can exclude any subunit with "Exclude": ["Users\\Bratislava\\TechDepartment\\Test"] |
|

|
Synchronization from specific Domain Controller
Specific Domain Controller
The --domain-controller parameter specifies the hostname or IP address of the machine to connect to in order to fetch data from the Active Directory.
When the --domain-controller parameter is set, the specified information will be saved to the database. Subsequently, whenever the client runs ADScanner, it will use the domain controller stored in the database.
To reset the domain controller configuration, set the --domain-controller parameter to an empty string. Example: --domain-controller ""
Specific Domain Controller Active Directory Username
The --domain-controller-user parameter specifies the Active Directory username. This username is associated with the --domain-controller parameter and is used for authentication. Example: --domain-controller-user "username"
Specific Domain Controller Active Directory Password
The --domain-controller-password parameter specifies the Active Directory password. This password is associated with the username provided in the --domain-controller-user parameter and is used for authentication. Example: --domain-controller-password "your_password"
|
5.When requested, type the Active Directory user password.
6.After the Active Directory Scanner completes the synchronization, your Active Directory structure (organizational units with computers/users) will appear in Computers/Computer Users in the ESET PROTECT Web Console as Static Groups with computers and/or User Groups with Users in Computer Users.
|

|
The Active Directory Scanner creates an Active Directory Synchronization task in the Windows Task Scheduler with a trigger repeat interval set to 1 hour. You can adjust the Active Directory synchronization interval in the Task Scheduler based on your preference. Any future changes to your Active Directory structure will be reflected in the ESET PROTECT Web Console after the next synchronization.
Optionally, you can use --no-scheduled-task parameter to start synchronization without the Windows Task Scheduler. Active Directory will be synchronized only once and future changes in Active Directory will not be automatically synchronized with ESET PROTECT. If the task already exists, --no-scheduled-task parameter will not create the task again or update it.
|
|

|
Active Directory synchronization limitations:
•Active Directory Scanner synchronizes only Active Directory organizational units that contain users. Organizational units that do not contain any users will not be synchronized.
•If you delete an organizational unit in Active Directory, all users in the unit will be removed from the corresponding User Group in the ESET PROTECT Web Console. Empty synchronized groups are removed as well.
•If you delete a synchronized Active Directory User from the ESET PROTECT Web Console, it will not re-appear after the next synchronization, even though it remains in the Active Directory until some of the synchronized properties are changed in the source Active Directory. |
To see the Active Directory Scanner help, use one of these parameters: -? -h --help.

For troubleshooting purposes, view the logs located in C:\ProgramData\ESET\ActiveDirectoryScanner\Logs.
|
Alternatively, you can use one of the workaround solutions below:
•Export the list of computers from Active Directory and import it to ESET PROTECT
•Deploy the ESET Management Agent to Active Directory computers using a Group Policy Object
Export the list of computers from Active Directory and import it to ESET PROTECT
|

|
This solution provides a one-time Active Directory synchronization only and does not synchronize any future Active Directory changes.
|
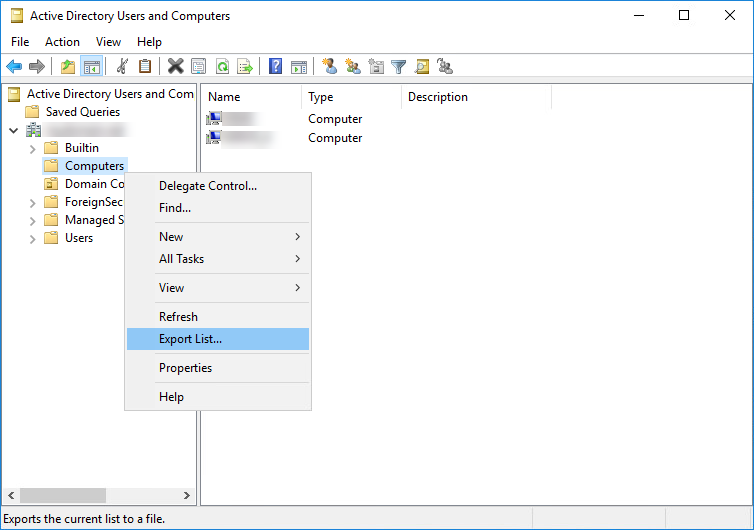
1.Export the list of computers from Active Directory. You can use various tools, depending on how you manage Active Directory. For example, open the Active Directory Users and Computers, and under your domain, right-click Computers and select Export List.

2.Save the list of exported Active Directory computers as a .txt file.
3.Modify the list of computers to make the formatting acceptable for ESET PROTECT import. Ensure that each line contains one computer and has the following format:
\GROUP\SUBGROUP\Computer name
4.Save the updated .txt file with the list of computers.
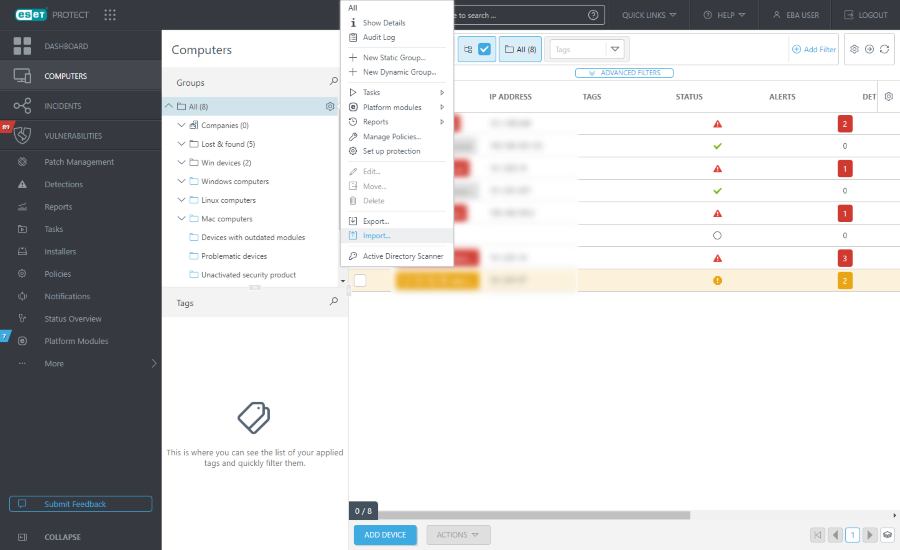
5.Import the list of Active Directory computers to the ESET PROTECT Web Console. Click Computers > click the gear icon next to the All Static Group and select Import.

Deploy the ESET Management Agent to Active Directory computers using a Group Policy Object
1.Create the Agent GPO deployment script.
2.Deploy the ESET Management Agent using a Group Policy Object (GPO)—start with step 3 in our Knowledgebase article.
3.After the successful ESET Management Agent deployment via GPO, the ESET Management Agent will be installed on Active Directory computers and computers will appear in the ESET PROTECT Web Console Computers screen.
Anytime you add a new computer to Active Directory in the future, it will appear in the ESET PROTECT Web Console Computers screen.
|


