ESET Managed Detection & Response
You need the following access rights to edit ESET Managed Detection & Response: •Use access—All Static Group •Use access—Report templates •Write access—Notifications •Write access—Server tasks •Write access—MDR reports •Write access—Groups & Computers •Write access—Policies MSP users need Use access to the All static group or to at least one company in their group tree. If you do not have the required access rights, ESET Managed Detection & Response is disabled. |
You need the ESET MDR subscription to have ESET Managed Detection & Response available. However, if stored email addresses, critical assets or suppressed MDR response actions are present, ESET Managed Detection & Response remains available for manual cleanup even after the MDR subscription expires. |
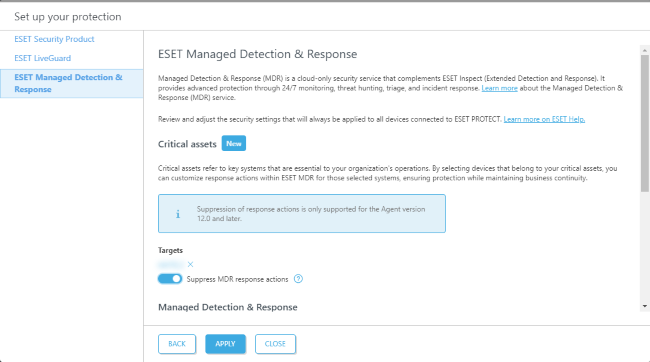
The wizard prompts you to adjust MDR settings:

MSP users can adjust settings globally or per company using the Applied to filter at the top. |
The settings are marked as Not applied if they are not applied yet. |
1.Click Select under Targets to select groups or devices belonging to your critical assets. You can customize response actions within ESET MDR for these selected systems, ensuring protection while maintaining business continuity. Click OK.
Critical assets refer to key systems essential to your organization´s operation. |
2.Select MDR response action settings:
•Suppress all MDR response actions—the ESET MDR service will not trigger any response actions automatically. You must manually respond to incidents.
The response action suppression is only supported for the Agent version 12.1 and later. |
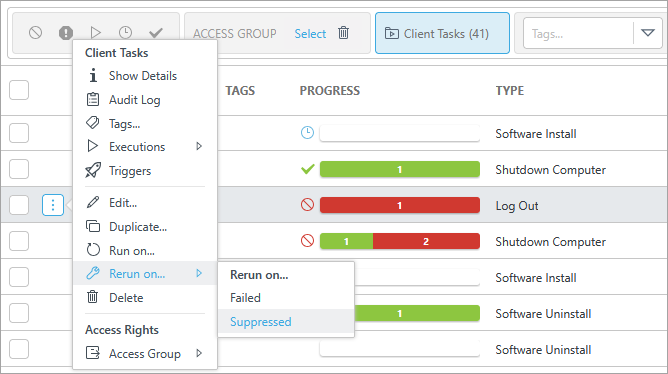
When you select critical assets and Suppress MDR response actions, be aware that created MDR response actions will not work (they will be suppressed). You must manage protection of critical assets independently. You will see the Suppressed status in a task´s Last progress status in the Task detail.
You can rerun the task on the computer with Suppressed status when necessary. Select the task from the Tasks list > Rerun on > Suppressed.
|
•Allow all MDR response actions—the ESET MDR service will automatically trigger all remediation actions.
•Allow only selected MDR response actions—you can select one or more response actions from the drop-down menu (Isolate Computer From Network, Kill process by PID, Log out, Reboot Computer(s), Shutdown Computer). The ESET MDR service will automatically trigger only the actions you select. You must manually trigger any non-selected actions.
3.Select Locale from the drop-down menu.
4.Select Time zone from the drop-down menu. Optionally, select Adjust for daylight saving time automatically.
5.Click Add to type a user´s email address and select what the user should receive (Monthly report, Weekly report or Notifications). Optionally, click More to:
•Add users—select a user from User Groups.
•Import CSV—upload a file, select Delimiter to divide data and Column mapping to select CSV headings and columns.
•Paste from clipboard—paste text, select Delimiter to divide data and Column mapping to select CSV headings and columns.
6.Click Apply to apply security settings or Next to continue with ESET Vulnerability & Patch Management.
After applying the settings, you can determine if a device is assigned as a critical asset in the Critical asset column in Computer details. |
Alternatively, you can set ESET MDR protection also via: •Tasks > ESET MDR monthly report task / ESET MDR weekly report task > Set up protection •Notifications > ESET MDR responded to an incident / Incident requires action > Set up protection •Configuration > Advanced setup > Critical assets - via basic setup policy > Set up protection |

