
Exclusions
AV Exlusions
In the AV Exclusions tab, you can see the list of all created exclusions for Antivirus detections and Firewall IDS rules. This new section contains all exclusions, increases their visibility and simplifies their management.
Click an exclusion or select more exclusions and click the Detection button to manage the exclusions:
• Change Assignments—Change the target computers where the exclusion will be applied.
• Show Affected Computers—See computers where the exclusion is applied.
• Audit Log—Show the Audit Log for the selected exclusion.
• Delete—Delete the exclusion.
• Access Group > Move—Move the object to another Static Group where it is available to users with sufficient rights for the target group. Changing the Access Group is useful when solving access issues with other users. Access Group sets the object's Static Group and access to the object based on the user's access rights.
If the excluded detection or firewall action appears again on the managed computers, the Hit count column displays the number of times the exclusion has been applied.
Migrate exclusions from a Policy
In ESET PROTECT, you cannot create Antivirus detection exclusions via a Policy. If your policies previously contained exclusions, follow the steps below to migrate exclusions from Policies to the Exclusions list in ESET PROTECT:
1.Navigate to Configuration > Advanced setup, click the policy that contains exclusions, and select Show Details.
2.Click Settings > Detection Engine.
3.Click View next to Detection exclusions.

4.Click the Export button and then click the button next to Download exported data and save the export.txt file. Click OK.

5.In the ESET PROTECT Web Console, navigate to More > Exclusions > AV Exclusions.
6.Click the Import button to import detection exclusions from a file. Click Choose file to upload and navigate to the export.txt file or drag and drop the file.
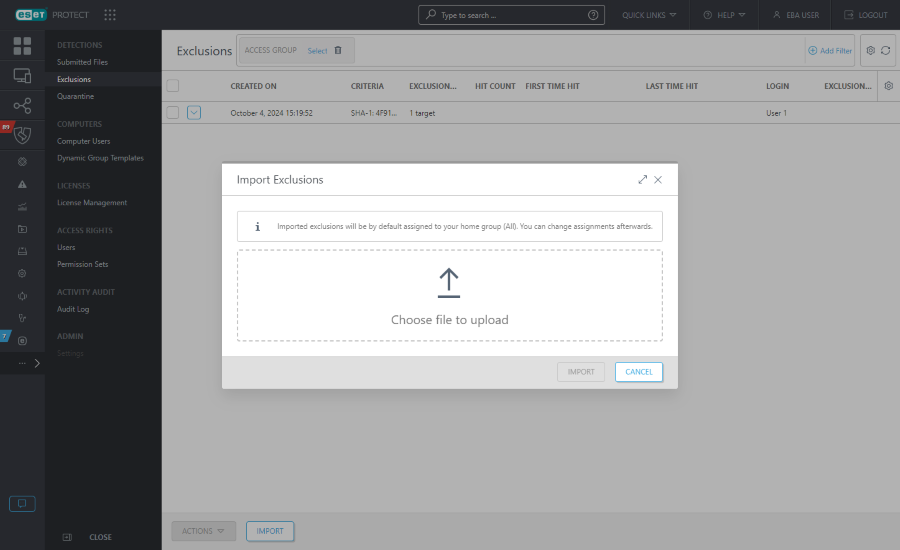
7.Click the Import button to import the detection exclusions. Imported detection exclusions will appear in the exclusions list.
|
Exclusions assignment limitations •The original exclusion assignments are not preserved. Imported detection exclusions are assigned to computers in your home group by default. To change the exclusion assignment, click the exclusion and select •You can assign exclusions (for |


Filters and layout customization
You can customize the current Web Console screen view:
•Manage the side panel and main table.
•Add filters and filter presets. You can use tags for filtering the displayed items.
EDR Exclusions
|
EDR rules, exclusions, and blocked hashes can now be managed directly from ESET PROTECT. These features will be released gradually throughout October 2026. Feature availability depends on your environment. |

In the EDR Exclusions tab, you can see the list of all exclusions for indicators created by triggering EDR rules.
Select an exclusion and click the Actions button, or click an exclusion to:
• View details—View Overview, Definition, assignment to Rules and Targets where the EDR exclusion is applied.
• Open rules—View exclusion assignment to Rules. Click the Manage Rules button to add or remove the rules.
• Enable—Enable the exclusion.
• Disable—Disable the exclusion.
• Edit—Edit the exclusion name, description, tags, definition, rules or targets.
• Manage targets—Add or remove targets for the exclusion.
• Manage rules—Add or remove rules for the exclusion.
• Tags—Assign tags from the existing list or create custom tags.
• Access Group > Move—Move the object to another Static Group where it is available to users with sufficient rights for the target group. Changing the Access Group is useful when solving access issues with other users. Access Group sets the object's Static Group and access to the object based on the user's access rights.
• Duplicate—Create a copy of the selected exclusion.
• Export > Export Selected or Export All—Start the exclusion´s export process to an XML file.
• Import—Open the window for importing the XML rule file.
• Delete—Delete the exclusion.
Create a new exclusion
1.Go to Exclusions > EDR Exclusions > click the New Exclusion button.
2.In the Basics section, type Name, Description, optionally select tags and enable exclusion right after it is created.
3.In the Definition section, define the criteria that determine which processes should be excluded from creating indicators. The criteria are grouped into the following scopes:
•Current process—Criteria matching the process that triggered the indicator you want to exclude.
•Parent process—Criteria matching the process that launched the current process involved in the indicator.
•Any ancestor process—Criteria matching any process higher up in the process tree that led to the current process.
Select Advanced view to write or modify criteria by the rule syntax or fill in the Current process, Parent Process and Any Ancestor Process.
•Process name is one of—The names of the processes that you want to exclude from the indicator.
•Process path starts with—The path to the process that you want to exclude from the indicator (C:\Windows or %SYSTEM% can be used).
•Cmd line contains—The command-line parameters used by the process that you want to exclude from the indicator.
•Signer is one of—The names of the signers associated with the process that you want to exclude from the indicator.
•Signature type is—The type of digital signature used by the process that you want to exclude from the indicator. Select comparison operators (for example, is, is not, greater than or equal, less than or equal) and select a signature type: Trusted, Valid, Self-signed, None, Invalid, or Present. This field is required when a signer is specified.
•SHA-1 is one of—The SHA-1 hash values of the processes that you want to exclude from the indicator.
•SHA-256 is one of—The SHA-256 hash values of the processes that you want to exclude from the indicator.
•User is one of—The usernames under which the process that you want to exclude from the indicator runs.
4.In the Rules section, select the rules to which you want to apply the exclusion. Click the Add rules button to manage rules.
5.In the Targets section, select the computers and groups to which you want to apply the exclusion. Click the Manage Targets button to manage computers and groups.
6.In the Summary section, review the exclusion details and click Finish.
|
You can create a new exclusion also via indicators: Go to Incidents > Indicators in the incident detail > click the indicator and select Create Rule Exclusion. Wizard opens automatically and pre-fills the settings from the indicator. |
