Filters and layout customization
The ESET PROTECT Web Console allows you to customize the layout of displayed items in the main sections (e.g. Computers, Tasks, etc.) in several ways:
Add filter and filter presets
To filter, click Add Filter:
1.In some filters, you can select the operator by clicking the operator icon next to the filter name (the available operators depend on the filter type):
Equal to or Contains
Not equal to or Does not contain
Greater than or equal to
Less than or equal to
2.Select one or more items from the list. Type a search string or select the items from the drop-down menu in the filter fields.
3.Press Enter. Active filters are highlighted in blue.
Filters can be saved to your user profile so that you can use them again in the future. Click the ![]() Presets icon to manage filter sets:
Presets icon to manage filter sets:
Filter sets |
Your saved filters, click one to apply it. The applied filter is denoted with a |
|
Create a new preset from your current filter configuration. When the preset is saved, you cannot edit the filter configuration in the preset. Select Include time range and columns in this template to save the time range and column visibility in the preset. |
|
Remove or rename existing presets. Click Save to apply the changes to presets. |
|
Click to remove only the current values from all filter fields in the filter panel. Saved presets will remain unchanged. |
|
Click to remove all filter fields from the filter panel. Saved presets will remain unchanged. |
|
Remove filter fields with no value from the filter panel. Saved presets will remain unchanged. |
|
Reset the filter panel and show the default filters. Saved presets will remain unchanged. |
![]() The Access Group filter button allows users to select a static group and filter viewed objects according to the group where they are contained.
The Access Group filter button allows users to select a static group and filter viewed objects according to the group where they are contained.
You can use tags for filtering the displayed items.
Side panel layout
Click the three dots![]() icon next to the section name and adjust the side panel layout using the context menu (available options may vary based on the current layout):
icon next to the section name and adjust the side panel layout using the context menu (available options may vary based on the current layout):
•![]() Hide side panel
Hide side panel
•![]() Show side panel
Show side panel
• Groups
•![]() Groups and Tags
Groups and Tags
•![]() Tags
Tags
If Groups are visible, you can select also one of these options:
•![]() Expand All
Expand All
•![]() Collapse All
Collapse All
Manage the main table
To reorder a column, hover the mouse over the ![]() icon next to the column name and drag-and-drop the column. See also Edit columns below.
icon next to the column name and drag-and-drop the column. See also Edit columns below.
For sorting by a single column, click the column header to sort table rows based on data in the selected column.
•One click or two clicks result in ascending (A–Z, 0–9) or descending (Z–A, 9–0) sorting.
•After you apply the sorting, a small arrow before column header indicates the sorting behavior.
Click the ![]() gear icon to manage the main table:
gear icon to manage the main table:
Actions
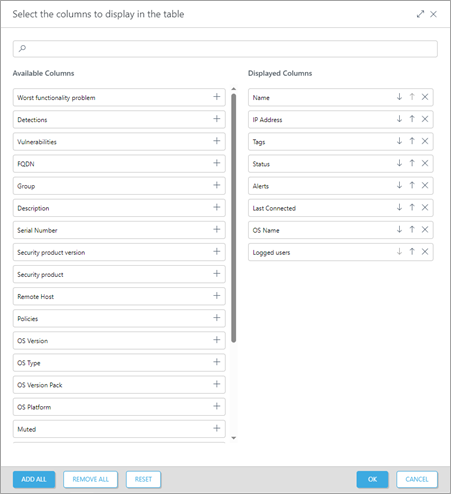
•![]() Edit columns—Use the wizard to adjust (
Edit columns—Use the wizard to adjust (![]() add,
add, ![]() remove,
remove, ![]()
![]() reorder) the displayed columns. You can also use drag-and-drop to adjust the columns. Click Reset to reset the table columns to their default state (default available columns in a default order).
reorder) the displayed columns. You can also use drag-and-drop to adjust the columns. Click Reset to reset the table columns to their default state (default available columns in a default order).

•![]() Auto-fit columns—Automatically adjust columns width.
Auto-fit columns—Automatically adjust columns width.
•![]() Display Relative Time/Display Absolute Time—Change the display format of the time data in the main table (for example, Last Connected in Computers or Occurred in Detections). When you enable Display Relative Time, hover a mouse over the relative time in the table to see the absolute time.
Display Relative Time/Display Absolute Time—Change the display format of the time data in the main table (for example, Last Connected in Computers or Occurred in Detections). When you enable Display Relative Time, hover a mouse over the relative time in the table to see the absolute time.
Table Sorting
•Reset Sorting—Reset the column sorting.
Download as
•CSV (only table data)—Export the table as a report in CSV format
•PDF—Export the table as a report in PDF format