Threat
Create a monitoring policy to monitor a new Threat detected by any scan on your managed devices with installed and activated supported ESET security applications. (Optional) Include automatic action as a task to be performed based on the monitoring alert.
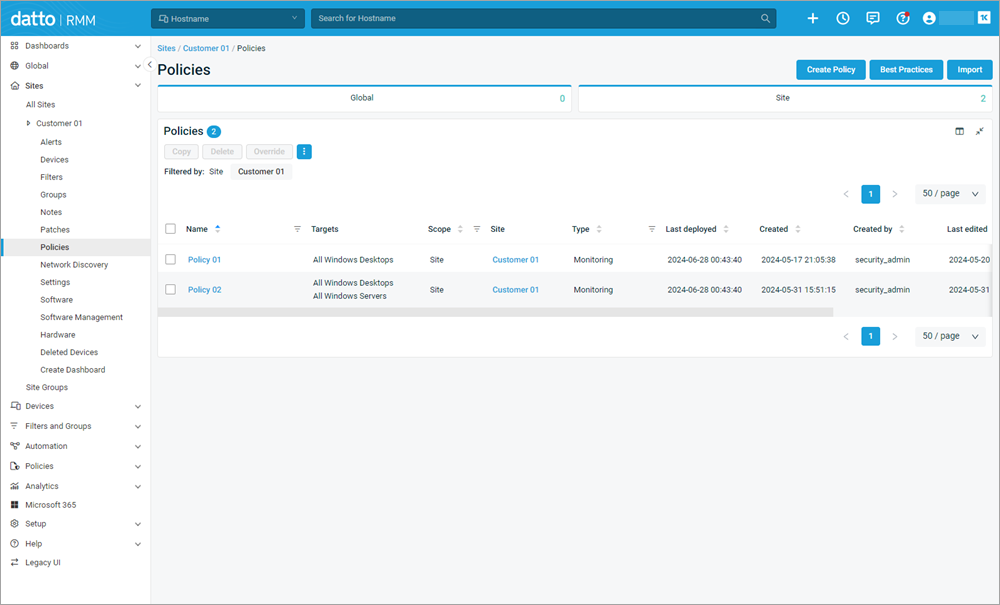
1.From the left menu, click Sites > All Sites and then select the desired site.
2.Click Policies.

3.Click the Create Policy button.
4.Type policy Name and Description.
5.Select policy Scope. If you select Site, confirm the desired site name in the search window below.
6.Select policy Type to Monitoring from the drop-down menu.
7.In the Monitors section, click the Add Monitor button.
8.In the Monitor Type section, click the Select button. In the Select a Monitor window, click the Select button next to Component.
9.In the Alert section, click the Select a Component Monitor button.
10. In the Device Monitor Components window, click the Select button next to the desired ESET Direct Endpoint Management - Monitor [XXX] component.
OS-specific components Select an operating system component: Windows [WIN], macOS [MAC] or Linux [LIN]. |
11. In the Configure the Monitor alert criteria for your monitor component, next to Variables, click check box next to Threat only.
12. Select the User-Defined Field esetProductStatusUDF, esetProtectionStatusUDF, esetProtectDetailsUDF and esetThreatScanStatusUDF you previously configured in the User-Defined Fields from the drop-down menu by mapping the correct field line number.
UDF updates Selecting all User-Defined Fields ensures they are updated on each monitoring run. |
13. Click the drop-down menu next to ThreatSeverityFilter, and select the desired option Info, Warning or Critical. Leave the ProtectionStatusSeverityFilter, ScanSeverityFilter and FirewallSeverityFilter unchanged, as these settings will not be taken into account by the monitor.
Filter log severity •Info—No filtering •Warning (default)—Only items with a greater than or equal to warning severity are returned in the output. •Critical—Only items with critical severity are returned in the output. For example, a threat that failed to be cleaned or a protection status for the application indicating that there is a major functional problem, for example, "Product not activated". The severity is determined for the ESET DEM plugin for Datto RMM by the ESET security application installed and activated on your managed device. |
14. For the Execute the Component Monitor every (minutes), set the runtime interval in minutes. For example, every 5 minutes.
15. For the Raise an alert of priority, select the desired priority. For example, Critical.
16. For the Auto resolve the alert if it is no longer applicable, set the desired time interval. For example, After 1 week.
Threat auto-resolution timing If the threat monitoring is running and detects a new threat, it will return the monitoring with the threat detected. When you run monitoring again shortly afterwards the new threat monitoring run will check only logs since the last monitoring run and will not detect the previous threat again. We recommend setting longer time intervals for auto-resolve threat monitoring. |
17. (Optional) You can configure automatic action in a form of task to be performed based on the monitoring alert. In the Response section, click the Run a Component toggle. In the Component Library window, click the Select button next to the desired ESET Direct Endpoint Management - Tasks [XXX] component.
OS-specific components Select an operating system component: Windows [WIN], macOS [MAC] or Linux [LIN]. |
18. Select the desired Task from the drop-down menu. Configure other task variables if necessary, overriding both global and site-specific variables.
Example response For the Threat monitoring alert, configure the Scan task to automatically scan any device to confirm the previous threat cleanup. |
19. (Optional) Click the Send an email toggle, to send an email alert to one or multiple recipients. Configure the email Subject line and Recipients.
20. (Optional) Click the Send a webhook toggle to send a notification When alert is triggered (by default) or When alert is resolved (optional). Configure the webhook URL, Content Type and the Alert raised payload.
21. Click Add Monitor.
Multiple monitors You can add other monitors to the same policy to perform additional actions. Click the Add Monitor button again. |
22. (Optional) In the Targets section, click the Add Target button to specify the target devices for this policy. By default this policy will run on all devices in the selected site (step 5), but you can specify targets further by selecting one of the options from the next window. For example, All Windows Desktops in the selected site.
Multiple targets You can add other targets to the same policy. Click the Add Target button again. |
23. (Optional) In the Enabled section click the Disabled button to disable the policy for now. The created policy is enabled by default.
24. Click the Save and deploy now button. In the next window click Confirm.
A short confirmation message, "Policy saved successfully", will appear.