ESET Bridge Policy
You can configure ESET Bridge only remotely from the cloud ESET PROTECT or ESET PROTECT On-Prem using an ESET Bridge Policy:
The steps below describe the settings in the ESET PROTECT On-Prem. Similarly, you can perform these steps in the cloud ESET PROTECT. If there is an existing ESET Bridge Policy in place, you can: •Request the applied ESET Bridge configuration to see the current ESET Bridge configuration. •Edit the existing ESET Bridge Policy instead of creating a new one. |
1.Open the ESET PROTECT Web Console in your web browser and log in.
2.In ESET PROTECT On-Prem, click Policies > Add. In the cloud ESET PROTECT, click Configuration > the Advanced setup tab > New Policy.
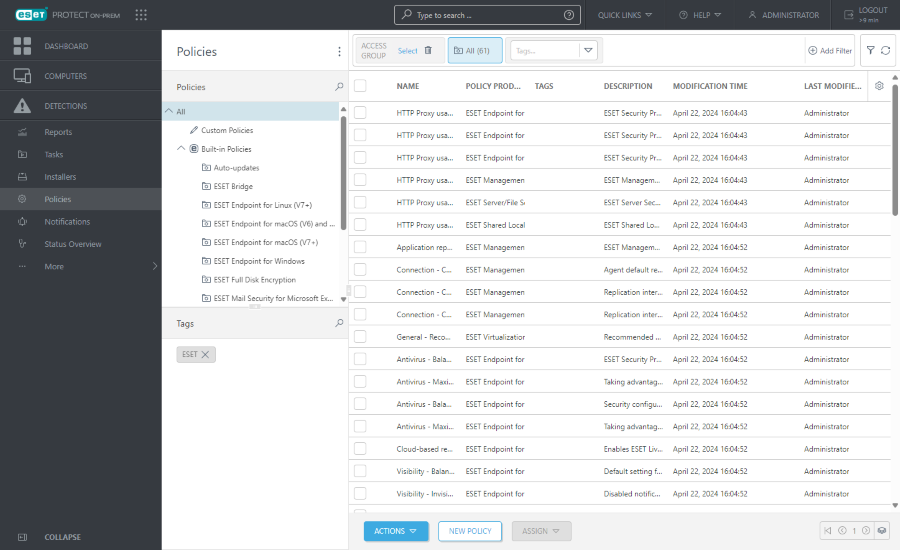
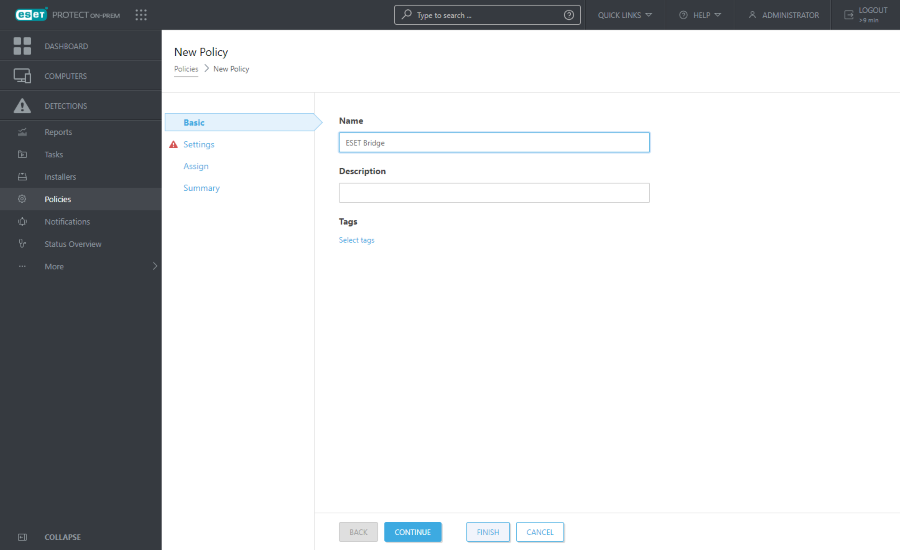
3.Type the Name. You can also type the Description and Select tags.
4.Click Settings and select ESET Bridge from the Select product drop-down menu.
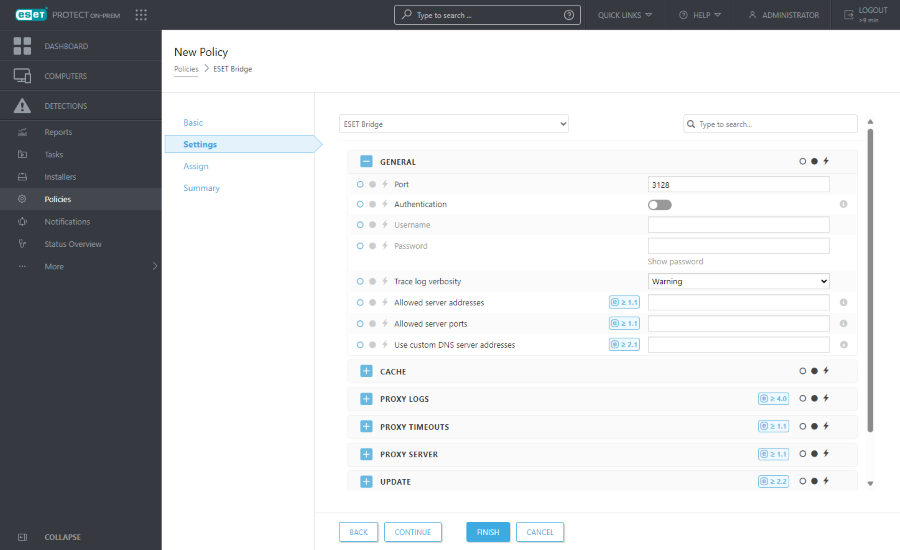
5.Configure ESET Bridge Policy settings:
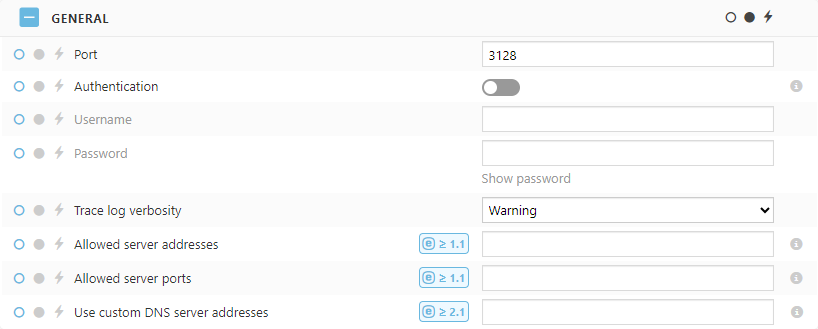
•Port—By default, ESET Bridge uses port 3128. You can set a custom port.
•Authentication—By default, there is no proxy server authentication. Enable the toggle and type the Username and Password to enable the authentication.
•Trace log verbosity—Select the trace log verbosity level from the drop-down menu: 0 (turn the logging off), Debug, Information (default), Warning, Error, Fatal. •Allowed server addresses—ESET Bridge has a default deny policy for the requests passing through, and only ESET hosts are allowed by default. To allow additional server addresses (hostnames), type domain names, fully qualified domain names, or IP addresses (separate addresses by a comma). •Allowed server ports—By default, ESET Bridge only allows ports used by the ESET servers. To allow additional ports (for example, a custom ESET PROTECT On-Prem port), type port numbers (separate ports by a comma).
•Use custom DNS server addresses—Use custom DNS servers instead of the default DNS servers found on the ESET Bridge computer. Type custom DNS server addresses as domain names or IP addresses separated by a comma. |
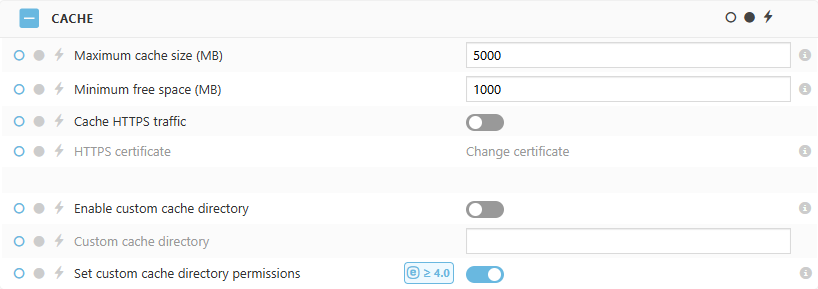
•Maximum cache size (MB)—The default and recommended value is 5000. If the cache size exceeds the set maximum cache size, the oldest cached data will be removed.
•Minimum free space (MB)—The default value is 1000. If the free space goes under the set minimum space, the least recently used cached data will be removed.
•Cache HTTPS traffic—Enable the toggle to enable HTTPS traffic caching.
•HTTPS Certificate—Add or change a peer certificate required for HTTPS traffic caching.
•Enable custom cache directory—Enable the toggle and type the Custom cache directory to store cache files in a custom directory. By default, ESET Bridge stores the cache files in the eset_cache directory: oWindows: C:\ProgramData\ESET\Bridge\Proxies\Nginx\data\eset_cache oLinux: /var/opt/eset/bridge/nginx/data/eset_cache
•Set custom cache directory permissions—Enable the toggle to set all the necessary permissions for the custom cache directory. If the directory does not exist, it will be created. This feature is available only on Windows.
|
•Custom proxy logs directory—Type a custom path for the Nginx proxy logs. By default, the proxy logs directories are: oWindows: C:\ProgramData\ESET\Bridge\Proxies\Nginx\logs oLinux: /var/opt/eset/bridge/nginx/logs
•Set proxy logs directory permissions—Enable the toggle to set all the necessary permissions for the custom logs directory. If the directory does not exist, it will be created. This feature is available only on Windows.
|
•Keepalive timeout—Set a timeout during which a keepalive client connection will stay open on the proxy side (in seconds; the default value is 60). The zero value disables keepalive client connections. •Send timeout—Set a timeout for transmitting a response to the client (in seconds; the default value is 60). The timeout is set only between two successive write operations, not for the transmission of the whole response. If the client does not receive anything within this time, the connection is closed. •Connect timeout—Set a timeout for establishing a connection with a proxied server (in seconds; the default value is 60). •Read timeout—Set a timeout for reading a response from the proxied server (in seconds; the default value is 60). The timeout is set only between two successive read operations, not for the transmission of the whole response. If the proxied server does not transmit anything within this time, the connection is closed. |
•Use proxy server—Enable the toggle to connect ESET Bridge via a proxy server (the proxy chaining feature). •Proxy server—Specify the remote proxy server hostname or IP address. •Port—Specify the remote proxy port. •Enable bypass for upstream proxy—Enable this setting to bypass the upstream proxy for specified addresses. Requests to these addresses will not be forwarded to the upstream proxy. •Bypass upstream proxy server addresses—Type server addresses (separated by a comma) that will bypass the upstream proxy. Requests to these addresses will not be forwarded to the upstream proxy.
|
•Auto-updates—Enable the toggle to enable ESET Bridge auto-updates. ESET Bridge (version 3 and later) supports auto-updates, which are enabled by default. When a more recent ESET Bridge version is available, ESET Bridge is automatically upgraded. |
•Report open proxy—If ESET Vulnerability & Patch Management is enabled, ESET Bridge will switch to open proxy mode. Disable this option to hide the Access restrictions are disabled alert in the ESET PROTECT Web Console. |
6.Click Assign and assign the computer running ESET Bridge as the policy target.
7.Click Finish, or click Summary to see the policy overview and then click Finish.
Request the applied ESET Bridge configuration to see the current ESET Bridge configuration.
