Extend endpoint management from ESET PROTECT to DEM plugin
To extend endpoint management from ESET PROTECT to the ESET DEM plugin for Datto RMM create an ESET RMM enabled policy using the ESET PROTECT policy creation wizard. Then, assign the policy to the desired devices.
ESET PROTECT versus DEM plugin We recommend using ESET PROTECT for endpoint management because it provides more options for comprehensive endpoint monitoring and incident analysis. Follow the steps below to extend endpoint management for specific devices to the Datto RMM and create the ESET PROTECT ESET RMM enabled policy. |
1.Set up the ESET DEM plugin for Datto RMM.
2.Run an Onboard (Install and Activate) task to deploy an ESET security application to desired devices.
3.In ESET PROTECT, create a policy to configure ESET RMM settings on all endpoints. This will allow them to be managed in the ESET DEM plugin for Datto RMM.
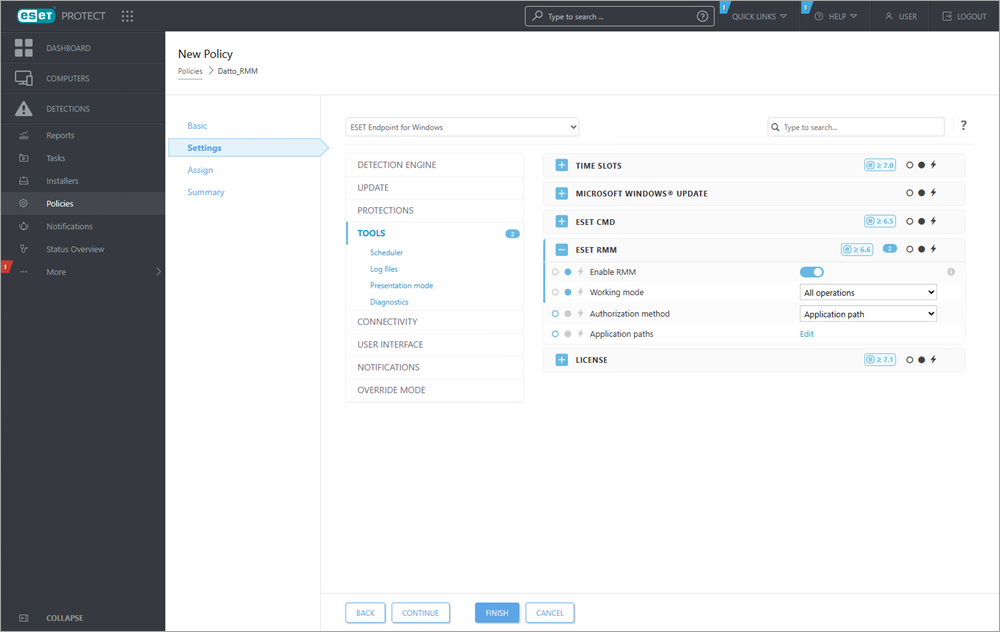
4.In the Settings section of the policy creation wizard, select ESET Endpoint for Windows from the drop-down menu.
5.Click Tools.
6.Expand section ESET RMM.
7.Click the Enable RMM toggle.
8.Next to Working mode select All operations from the drop-down menu.
9.Next to Authorization method select Application path from the drop-down menu.

10. Next to Application paths, click the Edit button.
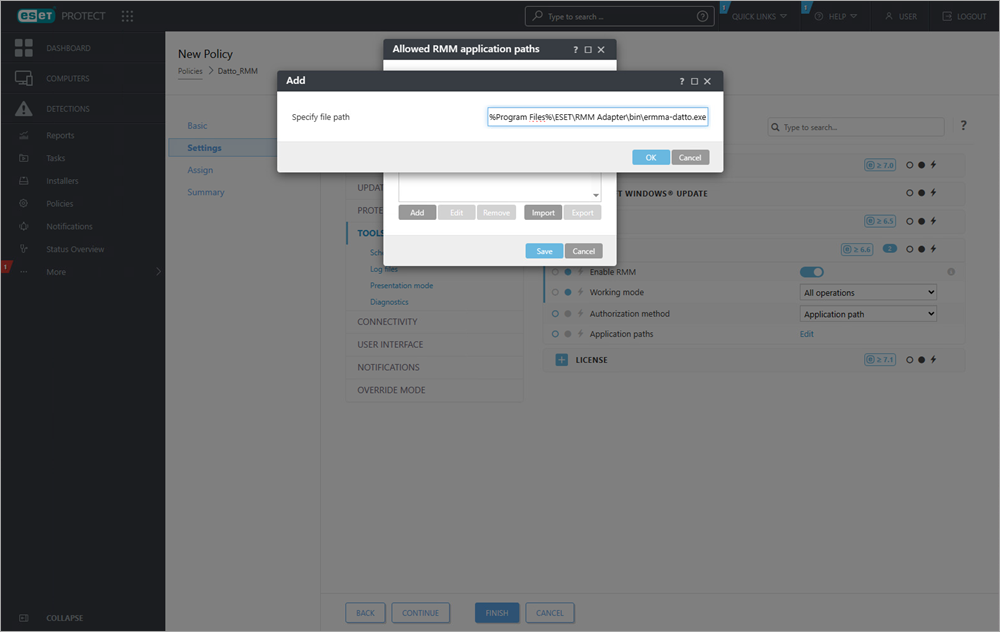
11. In the Allowed RMM application paths window, click Add.
12. Type the file path %ProgramFiles%\ESET\RMM Adapter\bin\ermma-datto.exe for the ESET DEM plugin for Datto RMM and click OK > Save.
File path entry Use the full path: C:\Program Files\ESET\RMM Adapter\bin\ermma-datto.exe instead of %Programfiles%\ESET\RMM Adapter\bin\ermma-datto.exe if necessary. |

13. Complete the remaining steps in the ESET PROTECT New Policy creation wizard and assign the policy to the desired endpoint computers.
Warning Verify that the new policy is applied to all intended endpoint computers before proceeding with the next step. |
14. Uninstall the ESET Management Agent on all endpoint computers managed by the ESET DEM plugin for Datto RMM to prevent configuration conflicts.