Clean Installation - same IP address
The objective of this procedure is to install an entirely new instance of ESET PROTECT Server that does not use the previous database. This new ESET PROTECT Server will have the the same IP address as your previous server, but will not use the database from the old ESET PROTECT Server.
The instructions below require that your old ESET PROTECT Server is running with an accessible Web Console. If your old ESET PROTECT Server is inaccessible: 1.Install ESET PROTECT Server using the All-in-one package installer (Windows) or choose another installation method (Windows manual installation, Linux or Virtual Appliance). 2.Connect to ESET PROTECT Web Console. 3.Add client computers to ESET PROTECT infrastructure and deploy the ESET Management Agent locally or remotely. |
I. On your current (old) ESET PROTECT Server:
If you manage devices encrypted with ESET Full Disk Encryption, follow these steps to avoid the loss of recovery data. 1.Before the migration - Navigate to Status Overview > Encryption. Here you can Export your current ESET Full Disk Encryption Recovery Data. 2.After the migration - Import the ESET Full Disk Encryption Recovery Data on your new management console. If you are unable to perform these steps, you need to decrypt the managed devices before the migration. After the migration, you can encrypt the managed devices from the ESET PROTECT Web Console. |
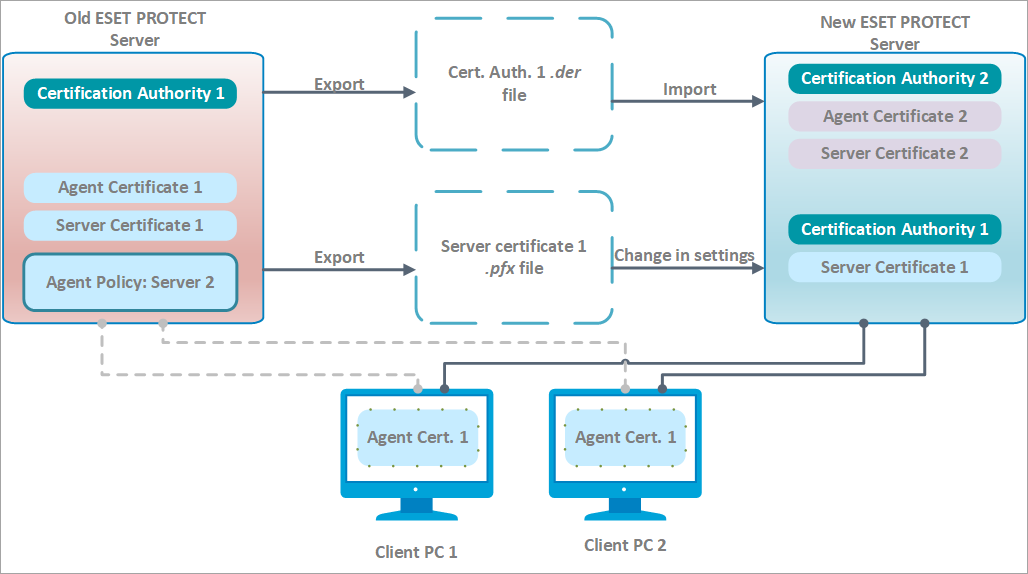
1.Export a server certificate from your current ESET PROTECT Server and save it to external storage.
•Export all Certification Authority Certificates from your ESET PROTECT Server and save each CA certificate as a .der file.
•Export Server Certificate from your ESET PROTECT Server to a .pfx file. The exported .pfx will include a private key as well.
2.Stop the ESET PROTECT Server service.
3.Turn off your ESET PROTECT Server machine.
Do not uninstall/decommission your old ESET PROTECT Server yet. |
II. On your new ESET PROTECT Server:
To use a new ESET PROTECT Server with the same IP address, ensure the network configuration on your new ESET PROTECT Server (IP address, FQDN, Computer name, DNS SRV record) matches that of your old ESET PROTECT Server. |
ESET PROTECT Mobile Device Management/Connector (MDM/MDC) component (on-premises only) reached End of Life in January 2024. ESET PROTECT On-Prem versions 11.1 and later do not support mobile device management. |
1.Install ESET PROTECT Server using the All-in-one package installer (Windows) or choose another installation method (Windows manual installation, Linux or Virtual Appliance).
2.Connect to ESET PROTECT Web Console.
3.Import all CAs that you have exported from your old ESET PROTECT Server. To do so, follow the instructions for importing a public key.
4.Change the ESET PROTECT Server certificate in More > Settings to use the Server certificate from your old ESET PROTECT Server.
5.Import all required ESET licenses to ESET PROTECT On-Prem.
6.Restart the ESET PROTECT Server service, see our Knowledgebase article for details.
After one or two Agent connection intervals, client computers should connect to your new ESET PROTECT Server using their original ESET Management Agent certificate, which is being authenticated by the imported CA from the old ESET PROTECT Server. If clients are not connecting, see Problems after upgrade/migration of ESET PROTECT Server.
When adding new client computers, use a new Certification Authority to sign the Agent certificates. This is done because an imported CA cannot be used to sign new peer certificates, it can only authenticate ESET Management Agents of client computers that were migrated. |
III. Old ESET PROTECT Server uninstallation:
When you have everything running correctly on your new ESET PROTECT Server, carefully decommission your old ESET PROTECT Server using our step-by-step instructions.
