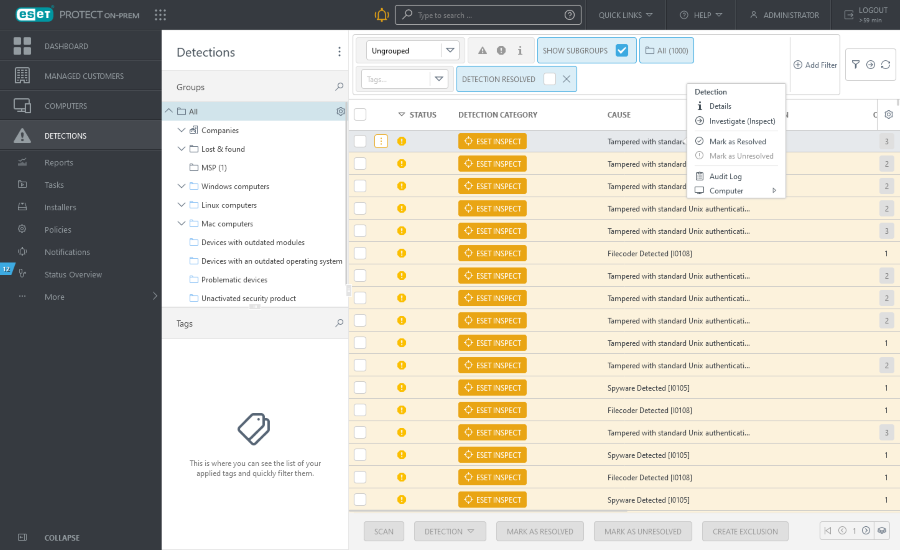
Manage Detections

Click a detection name to display the Detection preview side panel.
To manage detections, click the item and select one of the available actions, or select the check box next to one or more items and use the buttons in the lower part of the Detections screen:
•Scan - Run the On-Demand Scan Task on the device that reported the selected detection.
•![]() Details - See Detection Details.
Details - See Detection Details.
•Computer - A list of actions you can perform on the computer where the detection was found. This list is the same as the one in the Computers section.
•![]() Audit Log - View the Audit Log for the selected item.
Audit Log - View the Audit Log for the selected item.
•![]() Mark As Resolved or
Mark As Resolved or ![]() Mark As Unresolved - You can mark detections as resolved or not resolved here or in computer details.
Mark As Unresolved - You can mark detections as resolved or not resolved here or in computer details.
•![]() Scan Path (available only for
Scan Path (available only for ![]() Antivirus detections - files with known paths) - Create the On-Demand Scan Task with pre-defined paths and targets.
Antivirus detections - files with known paths) - Create the On-Demand Scan Task with pre-defined paths and targets.
•![]() Create Exclusion (available only for
Create Exclusion (available only for ![]() Antivirus detections and
Antivirus detections and ![]() Firewall IDS rules) - Create detection exclusions.
Firewall IDS rules) - Create detection exclusions.
•![]() Investigate (Inspect) allows you to open the item details directly in the ESET Inspect On-Prem Web Console. The Inspect
Investigate (Inspect) allows you to open the item details directly in the ESET Inspect On-Prem Web Console. The Inspect ![]() icon in the upper right opens the ESET Inspect On-Prem Web Console Detections section. ESET Inspect On-Prem is only available when you have ESET Inspect On-Prem license and ESET Inspect On-Prem connected to ESET PROTECT On-Prem. A Web Console user requires Read permission or higher for either Access to ESET Inspect or ESET Inspect User.
icon in the upper right opens the ESET Inspect On-Prem Web Console Detections section. ESET Inspect On-Prem is only available when you have ESET Inspect On-Prem license and ESET Inspect On-Prem connected to ESET PROTECT On-Prem. A Web Console user requires Read permission or higher for either Access to ESET Inspect or ESET Inspect User.
•![]() Send File to ESET LiveGuard is available only for
Send File to ESET LiveGuard is available only for ![]() Blocked files. You can send a file for the malware analysis (ESET LiveGuard Advanced) from ESET PROTECT Web Console. You can see the file analysis details in Submitted Files. You can manually submit executable files for analysis to ESET LiveGuard Advanced from the ESET endpoint product (you need to have the ESET LiveGuard Advanced license).
Blocked files. You can send a file for the malware analysis (ESET LiveGuard Advanced) from ESET PROTECT Web Console. You can see the file analysis details in Submitted Files. You can manually submit executable files for analysis to ESET LiveGuard Advanced from the ESET endpoint product (you need to have the ESET LiveGuard Advanced license).