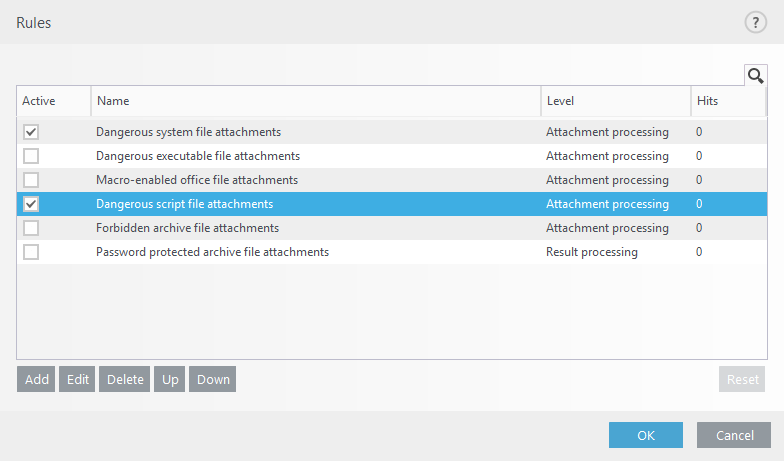
Rules
Enables you to manually define email filtering conditions and actions to take with filtered emails. You can also define conditions and actions that differ for rules specific to Mail transport protection, Mailbox database protection and On-demand mailbox database scan. This is because each of these protection types use a little different approach when processing messages, especially Mail transport protection.
NOTE The availability of rules for Mailbox database protection, On-demand mailbox database scan and Mail transport protection on your system depends on which Microsoft Exchange Server version is installed on the server with ESET Mail Security. |
IMPORTANT Incorrectly defined rules for On-demand mailbox database scan can cause irreversible changes to Mailbox databases. Always make sure you have the most recent backup of your Mailbox databases before running On-demand mailbox database scan with rules in place for the first time. Also, we highly recommend that you verify the rules are running according to expectations. For verification, define rules with Log to events action only, because any other actions can make changes to your Mailbox databases. Once verified, you can add destructive rule actions such as Delete attachment. |
Rules are classified into three levels and are evaluated in this order:
•Filtering rules (1) - rules evaluated before Antispam, Antivirus and Anti-Phishing scanning
•Attachment processing rules (2) - rules evaluated during Antivirus scan
•Result processing rules (3) - rules evaluated after Antispam, Antivirus and Anti-Phishing scanning
Rules with the same level are evaluated in the same order as they are displayed in the rules window. You can only change the rule order for rules of the same level. When you have multiple filtering rules, you can change the order they are applied in. You cannot change their order by putting Attachment processing rules before Filtering rules, the Up/Down buttons will not be available. In other words, you cannot mix rules of different Levels.
The Hits column displays the number of times the rule was successfully applied. Deselecting a check box (to the left of each rule name) deactivates the corresponding rule until you select the check box again.
Click Reset the counter for the selected rule (the Hits column). Select View allows you to view a configuration assigned from ESET PROTECT policy.
IMPORTANT Normally, if a rule's conditions are met, rules evaluation stops for further rules with lower priority. However, if required, you can use special Rule action called Evaluate other rules to let the evaluation to continue. |
Rules are checked against a message when it is processed by the Mail transport protection, Mailbox database protection or On-demand mailbox database scan. Each protection layer has a separate set of rules.
When Mailbox database protection or On-demand mailbox database scan rule conditions are matched, the rule counter may increase by 2 or more. This is because these protection layers access the body and attachments of a message separately, so rules are applied to each part individually. Mailbox database protection rules are also applied during background scanning (for example, when ESET Mail Security performs a mailbox scan following the download of a new virus signature database), which can increase the rule counter (Hits).
Rule wizard
1.Click Add (in the middle) and a Rule condition window will appear where you can select condition type, operation and value. Define condition(s) first, then action(s).
IMPORTANT You can define multiple conditions. If you do so, all of the conditions must be met for the rule to be applied. All conditions are connected using the logical operator AND. Even if most of the conditions are met and only a single one isn't, the condition evaluation result is considered not met and the rule's action cannot be taken. |
2.Click Add (at the bottom) to add a Rule action.
NOTE It is possible to add multiple actions for one rule. |
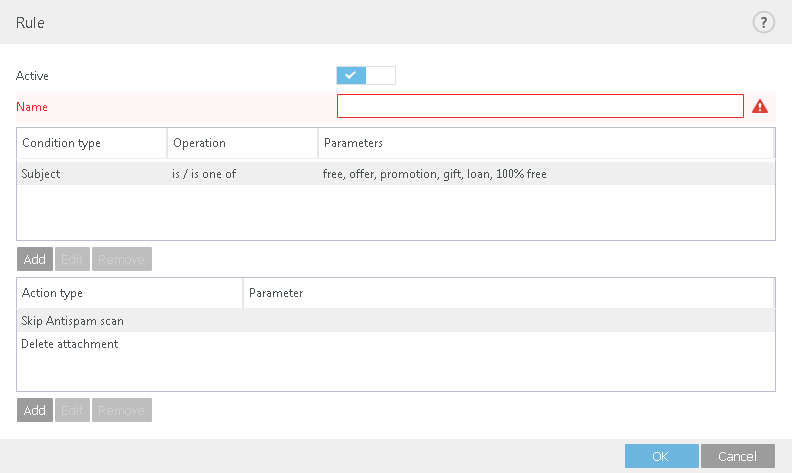
3.Once conditions and actions are defined, type a Name for the rule (something that you'll recognize the rule by), this name will be displayed in the Rules list. Name is a mandatory field, if it is highlighted in red, type a rule name into the text box and click OK to create the rule. Red highlight does not disappear even though you've entered rule name, it disappears only after you've clicked OK.
4.If you want to prepare rules but plan to use them later, you can click the slider bar next to Active to deactivate the rule. To activate the rule, select the check box next to the rule you want to activate.
NOTE If a new rule is added or an existing rule has been modified, message rescan will automatically start using the new/modified rules. |
See Rule examples that show how rules can be used.