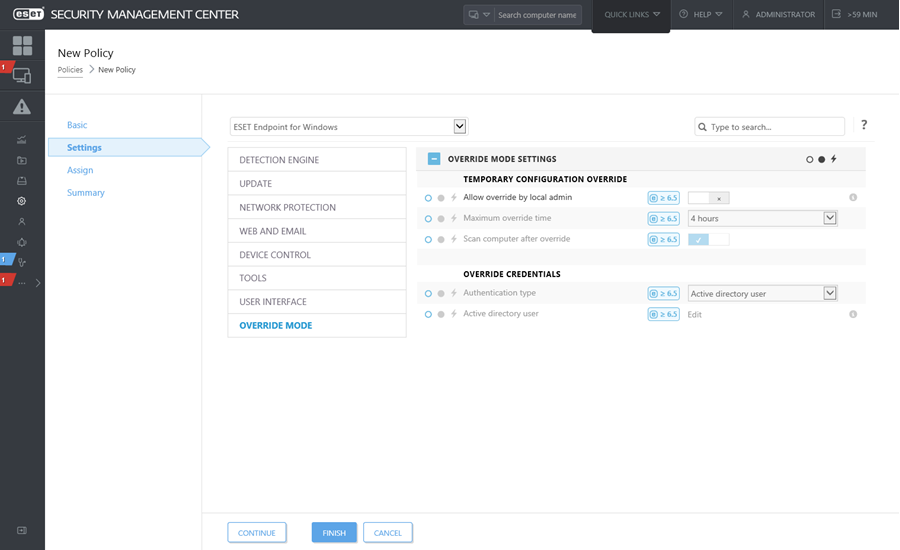
How to use Override mode
Users with ESET Endpoint products (version 6.5 and above) for Windows installed on their machine can use the Override feature. Override mode allows users on the client-computer level to change settings in the installed ESET product, even if there is a policy applied over these settings. Override mode can be enabled for certain AD users, or it can be password-protected. The function can not be enabled for more than four hours at once.
•Override mode cannot be stopped from the ESMC Web Console once it is enabled. Override mode will be disabled automatically when the override time period expires. It can also be turned off on the client machine. •The user who is using the Override mode needs to have Windows admin rights too. Otherwise, the user can not save the changes in settings of ESET Endpoint Antivirus. •Active Directory group authentication is supported for ESET Endpoint Antivirus version 7.0.2100.4 and later. |
To set the Override mode:
1.Navigate to ![]() Polices > New Policy.
Polices > New Policy.
2.In the Basic section, type in a Name and Description for this policy.
3.In the Settings section, select ESET Endpoint for Windows.
4.Click Override mode and configure rules for override mode.
5.In the Assign section, select the computer or group of computers on which this policy will be applied.
6.Review the settings in the Summary section and click Finish to apply the policy.

If John has a problem with his endpoint settings blocking some important functionality or web access on his machine, the Administrator can allow John to override his existing endpoint policy and tweak the settings manually on his machine. Afterward, these new settings can be requested by ESMC so the Administrator can create a new policy out of them. To do so, follow the steps below: 1.Navigate to Polices > New Policy. 2.Complete the Name and Description fields. In the Settings section, select ESET Endpoint for Windows. 3.Click Override mode, enable the override mode for one hour and select John as the AD user. 4.Assign the policy to John's computer and click Finish to save the policy. 5.John has to enable the Override mode on his ESET endpoint and change the settings manually on his machine. 6.On the ESMC Web Console, navigate to Computers, select John's computer and click Show Details. 7.In the Configuration section, click Request configuration to schedule a client task to get the configuration from the client ASAP. 8.After short time, the new configuration will appear. Click on the product which settings you want to save and then click Open Configuration. 9.You can review settings and then click Convert to policy. 10.Complete the Name and Description fields. 11.In the Settings section, you can modify the settings if needed. 12.In the Assign section, you can assign this policy to John's computer (or others). 13.Click Finish to save the settings. 14.Do not forget to remove the override policy once it is no longer needed. |
