Scan targets
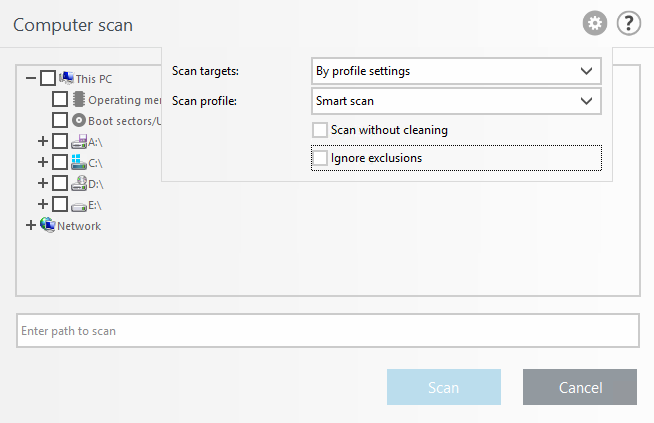
If you only want to scan a specific target, you can use the Custom scan and select an option from the Scan targets drop-down menu or select specific targets from the folder (tree) structure.
Scan targets profile selector applies to:
To quickly navigate to a scan target or to add a new target file or folder, enter its name in the blank field below the folder list. This is only possible if no targets are selected in the tree structure and the Scan targets menu is set to No selection.
Operating memory |
Scans all processes and data currently used by operating memory. |
|---|---|
Boot sectors/UEFI |
Scans Boot sectors and UEFI for the presence of malware. Read more about the UEFI scanner in the glossary. |
WMI database |
Scans the whole Windows Management Instrumentation (WMI) database, all namespaces, all class instances, and all properties. Searches for references to infected files or malware embedded as data. |
System registry |
Scans the whole system registry, all keys, and subkeys. Searches for references to infected files or malware embedded as data. When cleaning the detections, the reference remains in the registry to make sure no important data will be lost. |
The Scan targets drop-down menu allows you to select pre-defined scan targets.
By profile settings |
Selects targets set in the selected scan profile. |
|---|---|
Removable media |
Selects diskettes, USB storage devices, CD/DVD. |
Local drives |
Selects all system hard drives. |
Network drives |
Selects all mapped network drives. |
Shared Folders |
Selects all folders on the local server that are shared. |
Custom selection |
Clears all selections. Ones cleared, you can make your custom selection. |
You can choose a profile from the Scan profile drop-down menu to scan chosen targets. The default profile is Smart scan. There are two more pre-defined scan profiles: In-depth scan and Context menu scan. These scan profiles use different ThreatSense engine parameters.
The Custom scan window:

Scan without cleaning - If you are only interested in scanning the system without additional cleaning actions, select Scan without cleaning. This is useful when you only want to obtain an overview whether there are infected items and get details about these infections, if there are any. You can choose from three cleaning levels by clicking Setup > ThreatSense parameters > Cleaning. Information about scanning is saved to a scan log.
Ignore exclusions - You can perform a scan while ignoring exclusions that otherwise apply.
Action after Scan - Choose action to take after the scan finishes from the drop-down menu.
Scan cannot be interrupted - To deny non-privileged users the ability to stop actions taken after scanning.
The scan may be paused by user for (min) - Enable the limited user to pause the computer scan for the specified time limit.
Interrupt scan automatically after (min) - To cancel the scan if it takes longer than the specified time limit.
Scan as Administrator - It enables you to execute the scan under the Administrator account. Click this if the current user does not have privileges to access the appropriate files to be scanned. Note that this button is not available if the current user cannot call UAC operations as Administrator.