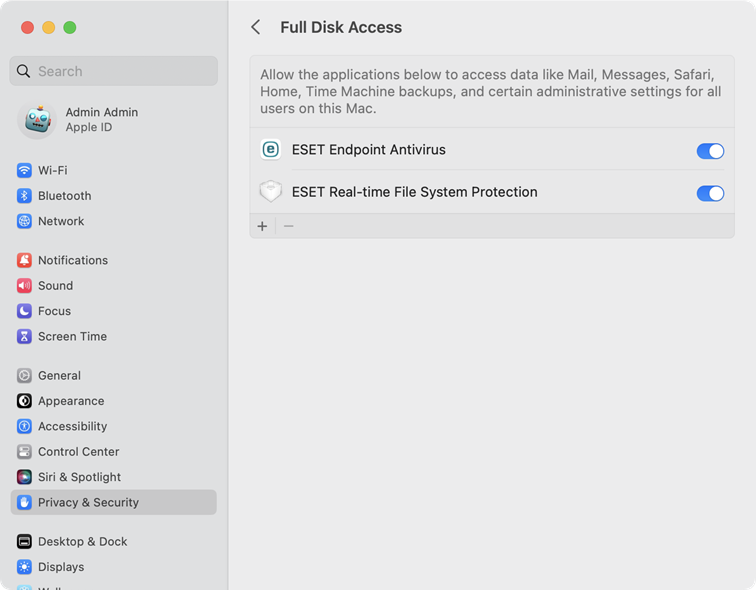
When installing ESET Endpoint Antivirus for macOS for the first time, you must allow ESET Endpoint Antivirus for macOS to protect system extensions and full disk access.
 macOS Ventura (13) and newer
1.Open System Settings.
2.Select Privacy & Security from the menu on the left.
3.Click the Full Disk Access option, and click the ESET Endpoint Antivirus for macOS toggle to enable it.
4.Use your Touch ID or click Use Password type your User Name and Password and click Unlock.
5.If a restart ESET Endpoint Antivirus for macOS prompt displays, click Later.
6.Click the ESET Real-time File System Protection toggle to enable it.

|

|
In case you are running the latest version of macOS Sonoma, versions 14.4 or 14.4.1, ESET Endpoint Antivirus for macOS can loose full disk access and ESET items need to be added manually as shown above.
|
|
 macOS Monterey (12) and older
1.Open System Preferences.
2.Navigate to Privacy tab and select Full Disk Access from the menu on the left.
3.Click the lock icon at the bottom left to allow changes in the settings window.
4.Use your Touch ID or click Use Password, type your User Name and Password, then click Unlock.
5.Select ESET Endpoint Antivirus for macOS from the list.
6.A restart ESET Endpoint Antivirus for macOS notification will display. Click Later.
7.Select ESET Real-time File System Protection from the list.
|

|
If the Real-time File System Protection option is unavailable, you must allow system extensions first, following the steps here.
|
8.Click Start Again in the alert dialog window to restart ESET Endpoint Antivirus for macOS to see your changes, or restart your computer. For more detailed information, visit our Knowledgebase article. |